15 Tips on How to Improve SEO on Squarespace
Search engine optimization (SEO) can be an elusive term that’s thrown around, but not totally understood. It has many different components, but if you’re reading this, you likely realize that SEO is important for your business.
As a Squarespace SEO expert, I’m here to explain how to improve Squarespace SEO for entrepreneurs like you.
If you want to know how to increase SEO on Squarespace, use these 15 Squarespace SEO tips as your Squarespace SEO checklist. But don’t bite off more than you can chew. SEO is technical, so I recommend choosing the top 5 Squarespace SEO tips that you feel you can accomplish on your own.
Then, consider reaching out to a Squarespace SEO expert like me to do the rest!
In this blog, we’re just touching the tip of the iceberg when it comes to SEO. There is MUCH more to be said, but these Squarespace SEO tips are meant to give you practical steps on how to improve Squarespace SEO today.
Is Squarespace good for SEO or is Squarespace bad for SEO?
Squarespace is good for SEO. It offers built-in SEO tools and features to help you optimize your website for search engines with ease.
“Is Squarespace good for SEO or is Squarespace bad for SEO?” is a common question I get from clients. Often, people ask this when considering whether to migrate their site from WordPress, which offers the Yoast SEO plugin – a tool for optimizing a WordPress website for search engines.
But Squarespace doesn’t require plugins. Its native SEO capabilities allow you to implement the following SEO best practices without getting under the hood. For further reading, Squarespace outlined a comprehensive SEO checklist that I highly recommend.
15 Squarespace SEO tips you need to implement today
Identify long-tail keywords
Add site and page titles
Add meta descriptions
Use keywords in URL slugs
Create a custom 404 page
Compress media
Add alt text to images
Enable SSL
Enable AMP
Verify your site with Google Search Console
Connect Google Analytics to Squarespace
Connect a custom domain
Structure content with proper header hierarchy
Add internal links throughout your website
Start writing SEO-friendly blogs
1. Identify Long-tail Keywords
A long-tail keyword is a phrase that generally consists of three or more words. Using long-tail keywords enables you to attract more qualified traffic because their search is more specific, which can lead to conversions.
You can identify relevant long-tail keywords by typing in words or phrases to a keyword research tool like Google Ads Keyword Planner, Ahrefs Keywords Explorer, or Moz’s Keyword Explorer.
You’ll want to add these keywords across your website, but you only have so many pages, right? Here’s what to do with the leftover keywords…
When you’re done weaving keywords into your main web pages, use the remaining long-tail keywords to write blog content. Can’t think of what to write? Every industry has a wealth of questions that clients are asking. Answer them in a blog format!
When you’re researching keywords, look for how you can turn a short-tail keyword (e.g., “SEO”) into a long-tail keyword by using it in a question (e.g., “What is Search Engine Optimization (SEO), and is it important?”). Now you’ve got a blog title.
Your article may even become the featured answer to that question on Google!
2. Add Site and Page Titles
Your site and page titles are what show up on Google Search when someone searches for your business, services, products, or blog content. Including SEO-informed site and page titles are crucial.
According to Moz, you should keep title tags under 60 characters. That way, your site and page titles aren’t truncated by search engines.
How to Add Site Title on Squarespace
Hover over your site header and click the button: Edit Site Header

2. In the pop-up box, click Site title & logo

3. Add your business name under Site Title

4. Next, from the Home panel, navigate to Marketing > SEO
5. Add a relevant keyword that you want to rank for after your site title (i.e., Squarespace web design and branding)
Note: Keep the %s before you add an extension to your site title. Those two characters automatically pull in the site title you previously inputted.

You can even see how it will display on search engines within Squarespace’s SEO editor.
How to Edit Page Titles in Squarespace
Navigate to Pages from the Home panel, then hover over the page you want to edit and click the gear icon

2. Page Title is the first option. This is where you enter a relevant page name. Ideally, you want the page title to be more than just a word like “About.” Include a keyword if you can to help that page display for user searches.
3. Add Meta Descriptions
Meta descriptions are the snippet of text that displays under your site title on search engines. A best practice is to ensure that the description’s length stays between 155 and 160 characters.
Again, using your long-tail keyword research mentioned above, you want to make sure you’re using relevant keywords in the meta description of each page.

4. Use Keywords in URL Slugs
A URL slug is the unique location of a page on your website. It’s what comes after your domain name. For example, /about is the URL slug for my about page: selahcreativeco.com/about.
In Squarespace, you can change a page’s URL slug by going to Page Settings.

Ideally, your page URLs should include a keyword. Instead of /services for your Service page, create unique pages for each of your services and use custom URL slugs including relevant keywords for each.
For instance, if you’re a Shopify developer, you could use: /shopify-web-development-services as your service page’s URL slug, which is a long-tail keyword that’s highly relevant.
However, you can’t just change URL slugs willy-nilly. If a page has been live for any amount of time, it’s already associated with a unique URL slug. If you change it, people who use the old URL will end up on a 404 error page.
If you want to change an existing page’s URL slug, you need to create a 301 redirect, but that’s a bit too technical for the content of this blog.
Take a look at your current pages right now and make sure none of the URLs are unoptimized with random numbers or characters (e.g., /service-1wqf). And if they are, reach out to a Squarespace web designer to update your page URL slugs.
5. Create a Custom 404 Page
A 404 page is the page you land on when you click a broken link. On some websites, it’s generic, while others are customized. Here’s an example of the generic 404 page on every Squarespace site:

It’s blank, boring, and a website visitor will probably just backtrack or exit your website at that point. Here’s an example of the custom 404 page I designed on my website:
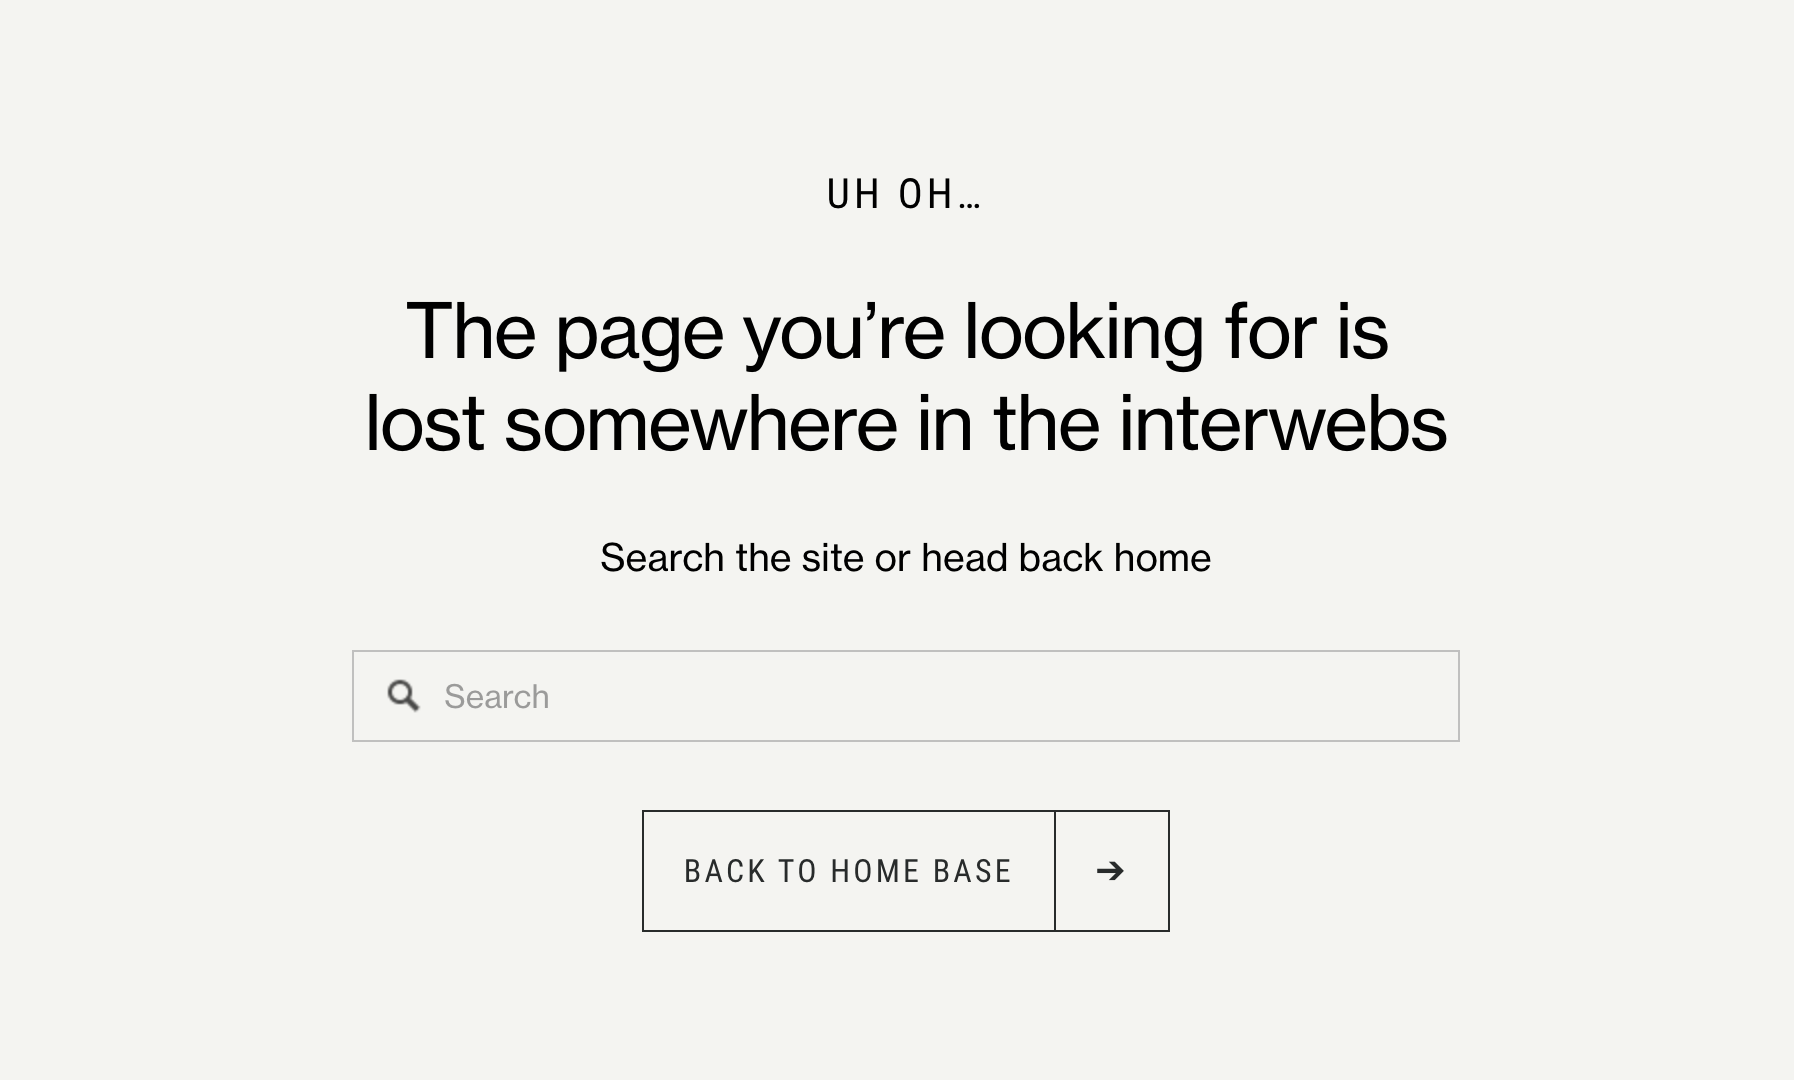
I acknowledge that the page is missing and give visitors two clear options: (1) search the site or (2) go back to the homepage. A custom 404 page provides a better user experience on your site and they aren’t hard to make.
How to Add a Custom 404 Page in Squarespace
Create a new, blank page
Add 404 as the Page title, Nav title, and URL slug
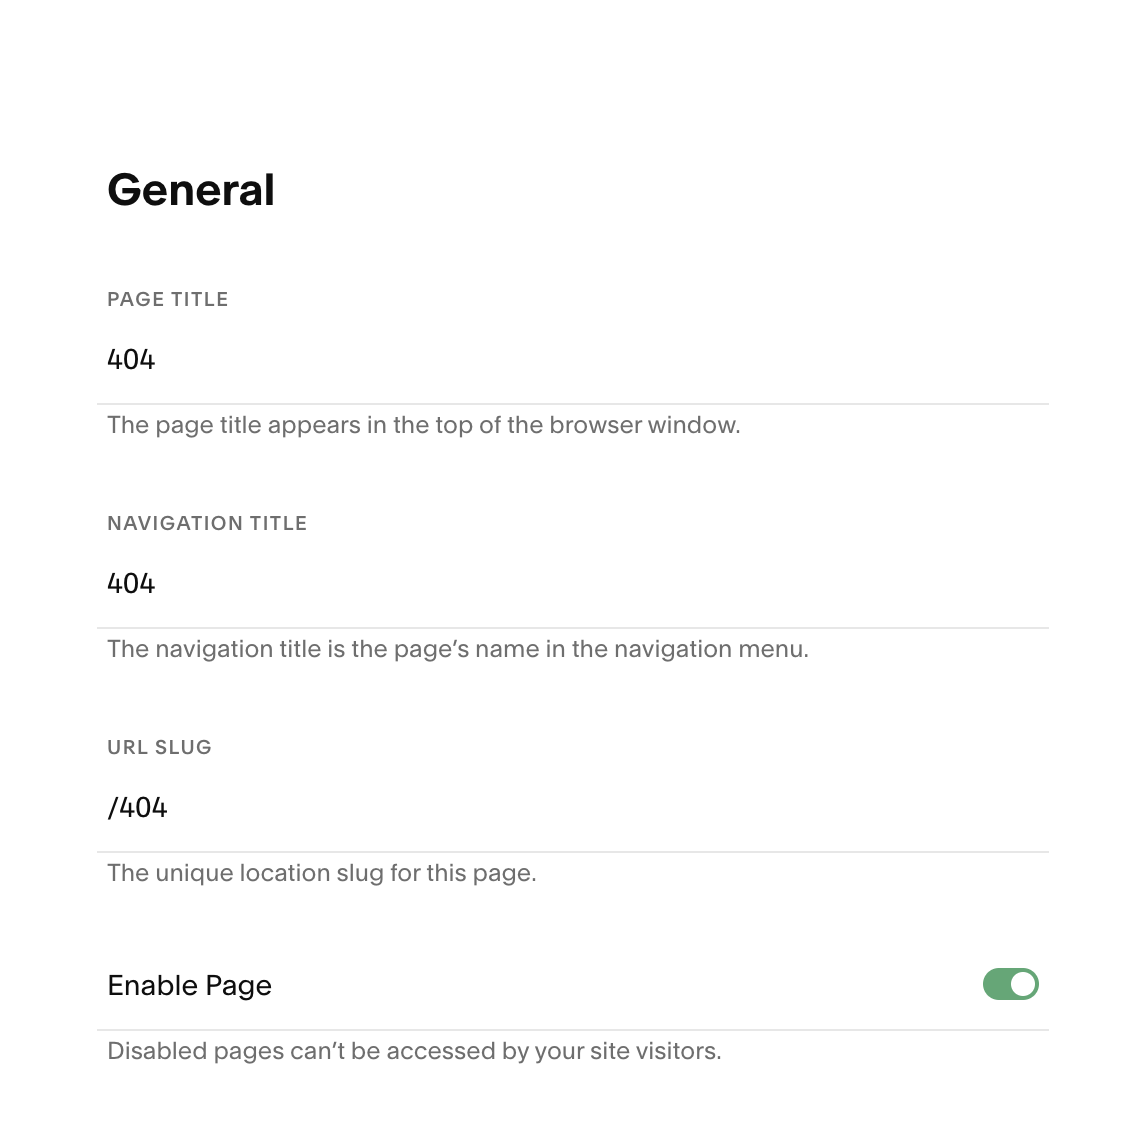
Click the SEO tab in Page Settings and toggle on “Hide Page from Search Results” (you don’t want to index your error page).
Think of a clever message for your 404 error page
Include an image that goes with the copy if possible
Add a button linking back to your homepage
6. Compress Media (e.g., Images, Videos)
Have you ever navigated to a website that took five years to load? You likely didn’t last more than 5 seconds before giving up and backtracking.
A big website page speed killer is large media files. When you upload an image to your website, its size needs to be less than 500kb and 2,000px wide.
Use a free photo compressor like tinypng.com to compress the size of images less than 5MB big. If you’re a photographer and have photos that are larger than that, you’ll need to compress your images in Photoshop. Here’s how to do it:
Put all of your images in a folder > right click on the folder > hover over Open With > Adobe Photoshop
When in Photoshop, go to File > Scripts > Image Processor
Select Use open images or select a folder from your drive
Select the folder you want to save the images in
Make sure “Save as JPEG” and “Resize to Fit” are checked. Put the Quality at 7, the Width at 1500px and the Higher at 1000px
Click Run
Now your images are compressed neatly in a folder on your computer named JPEG.
To test your website’s load time, go to PageSpeed Insights and enter your URL. It will score your website’s load speed on both mobile and desktop. Some opportunities to improve upon will be listed at the bottom of the page.
7. Add Alt Text to Images (i.e., File Names)
This is a huge mistake that most DIY websites make.
When you upload a photo from your computer or a stock photo site like Unsplash, the image name is likely a bunch of random characters: PHOTO-202124.png or john-forson-76EOO-b_Esw-unsplash.jpg.
When uploading photos to Squarespace, make sure you edit the file name and it’s Alt text. You can edit both of these by hovering over any image and clicking the pencil icon to populate the editor box.
For example, let’s take a look at how to properly name this photo.

When I open the content editor, this is what I wrote for the image’s Alt text and file name:

Your Alt text describes the image to search engines and those with disabilities. When possible, you want to incorporate keywords, but keep it short and descriptive.
Either the Alt text or file name will also display in the event that your photo doesn’t load on the page, that way people know what’s supposed to be there.
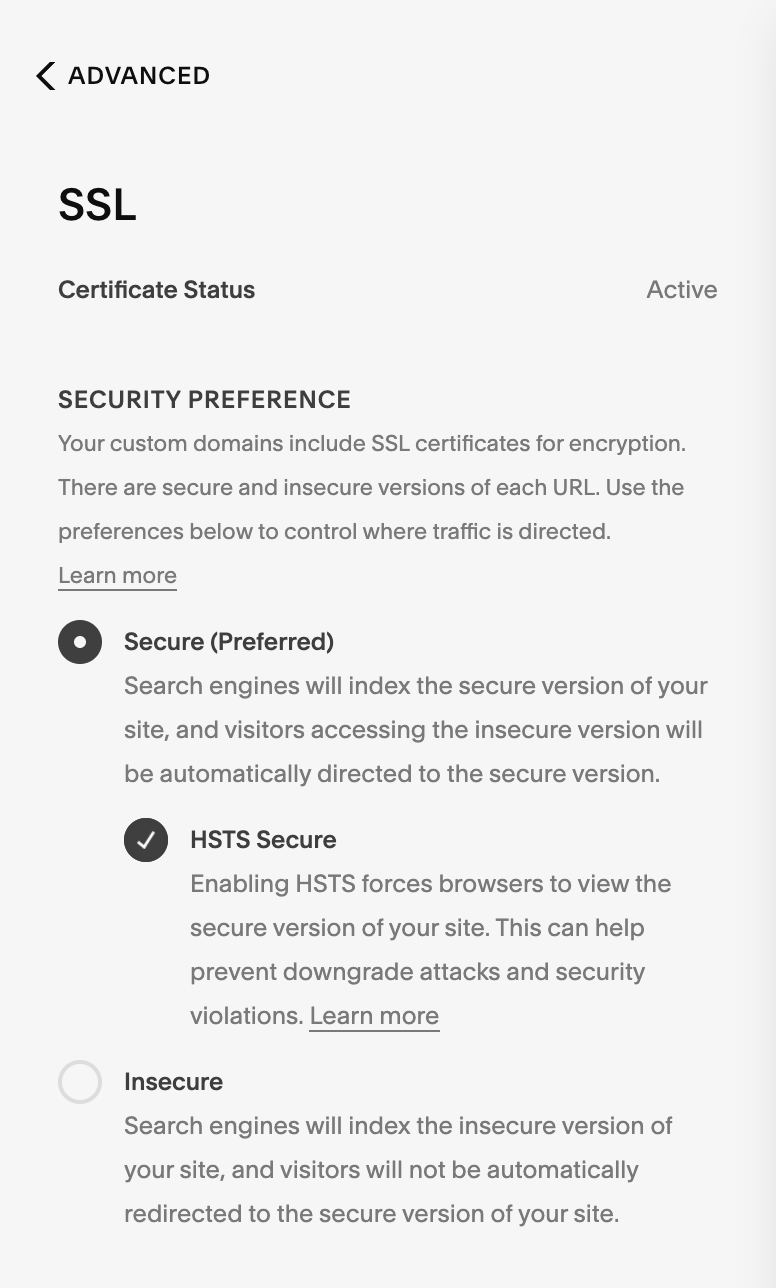
8. Enable SSL
All Squarespace Domains and third-party domains, such as those on GoDaddy, connecting and pointing to Squarespace websites include free SSL certificates. It’s an SEO best practice to secure your website via an SSL certificate. Websites that aren't SSL-secured may be penalized in search engine rankings and provide an unpleasant user experience.
How to Enable Your Squarespace Free SSL Certificate
Log in to Squarespace
From the Home page, navigate to Settings > Advanced > SSL
Ensure that your site has “Secure (Preferred)” and “HSTS Secure” selected
9. Enable AMP
Accelerated Mobile Pages (AMP) create lightweight versions of your web pages to decrease their load time on mobile devices. AMP versions of your web pages only appear in Google search results, which improves readability by displaying a simplified design. Other search engines will display the mobile-optimized version of the page.
In Squarespace, only blog posts inherit AMP formatting.
How to Enable AMP Formatting in Squarespace
Log in to Squarespace
From the Home menu, click Settings > Blogging
Scroll down to Accelerated Mobile Pages at the bottom of the Blogging page
Check Use AMP

10. Verify Your Site With Google Search Console
Google Search Console is a free SEO tool offered by Google. It gives business owners an inside look at how their website is performing on Google Search. To learn how to verify your website with Google Search Console, review Google’s documentation.
By navigating to “Search Console Insights” within Google Search Console, which is currently in beta, you can see the following data points:
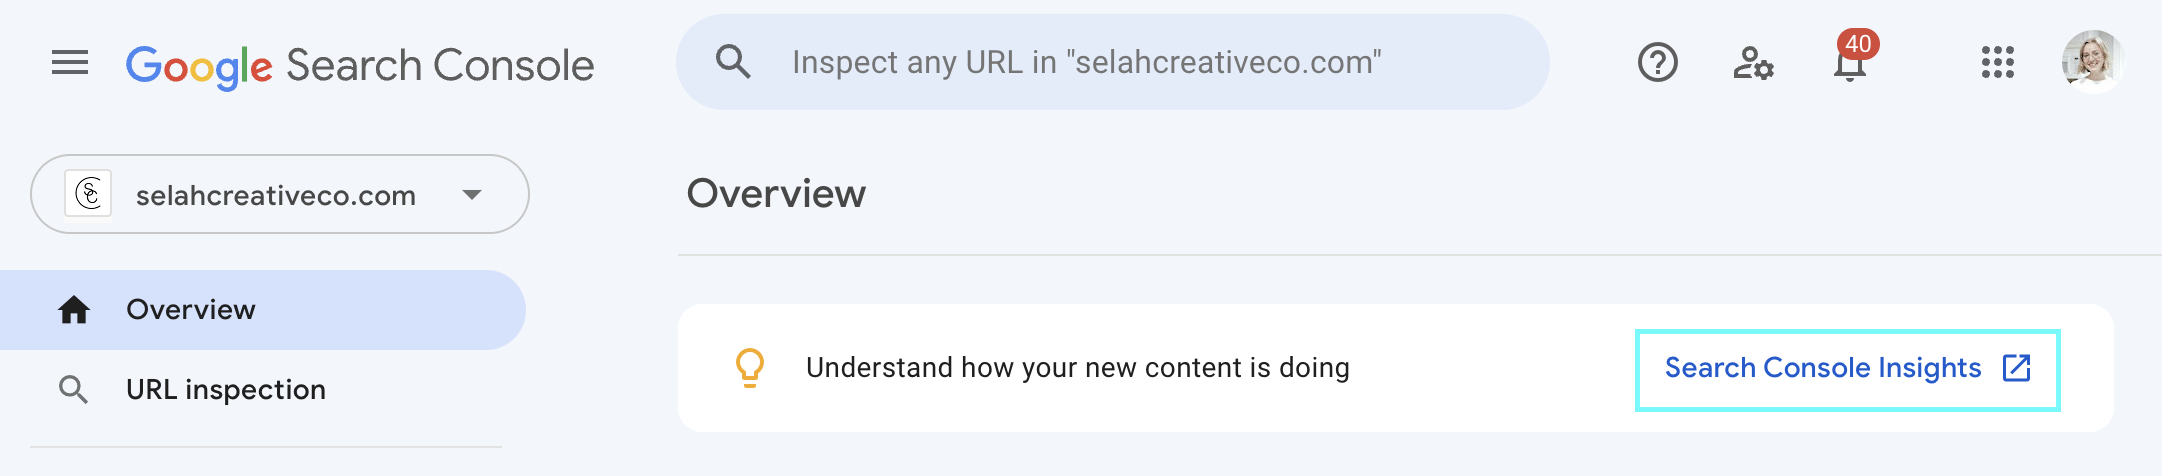
All-time page views
How new content is performing (e.g., blog posts)
Your most popular content
Top traffic channels
How visitors find your site on Google
Referring links from other websites
How visitors get to your site on social media
Once you’ve successfully verified your site in Google Search Console, there are two things you need to do:
Submit a sitemap to Google
Get Google to index your website
To learn how to submit a sitemap to Google and get Google to index your website, read my blog: How to Connect Your Squarespace Website With Google Search Console in 5 min (or less).
11. Connect Google Analytics to Squarespace
Google Analytics is another free product from Google that allows you to visually analyze website data. The data is grouped into five primary buckets: Real-time, Audience, Acquisition, Behavior, and Conversions.
Realtime shows you how many active users are currently on your site.
Audience goes into detail about your users, such as their demographics, interests, location, etc.
Acquisition has a helpful overview to visualize all of your website traffic via graphs.
Behavior shows you what pages people enter your site from and where the drop-off points are.
Conversions are only applicable if you set-up goals within Google Analytics, which is more advanced.
The homepage overview is also helpful. It depicts an overview of your site performance along with interesting insights like the most popular times of day that people are browsing your website.
Learn how to connect Google Analytics with Squarespace by following my step-by-step directions.
12. Connect a Custom Domain
Every Squarespace website comes with a built-in domain name. It’s usually something silly like purple-walrus-wtap . squarespace . com. You obviously don’t want to keep this as your domain. Whether you connect a custom domain to Squarespace or not, change the custom domain to your business name in the Domain panel.
From the Home panel, go to Settings > Domains
Click either Get a Domain or Use a Domain I Own to connect a custom domain
Click the built-in domain below those buttons to change your site ID.
I recommend Squarespace Domains to all of my clients because I think it’s best when your website and domain are hosted together. It just makes life easier. Whether you have a third-party hosting provider like GoDaddy or you want to transfer your domain to Squarespace, Squarespace has great documentation you can follow:
13. Structure Content With Proper Header Hierarchy
On your website, there are different size fonts. Every website attributes a code to these fonts, which are called header tags. Header tags are numbered one through six, decreasing in size and importance respectively. When used properly, header tags:
Make your content easier to read
Highlight the most important information
Help clarify your content
Tell Google what each page is about
When writing content for your web pages or blogs, these headings should be used in order. Heading 1 comes first, then H2, followed by H3, etc. Each heading is meant to provide further clarity around the one preceding it.
For instance, if I’m writing a blog, H1 is the title, H2 is the first heading covering a specific topic, H3s are subheadings nested under H2s to further clarify the main topic or create subtopics, H4s come after H3 if those points need additional clarification, and so on. Here’s an example of header hierarchy:
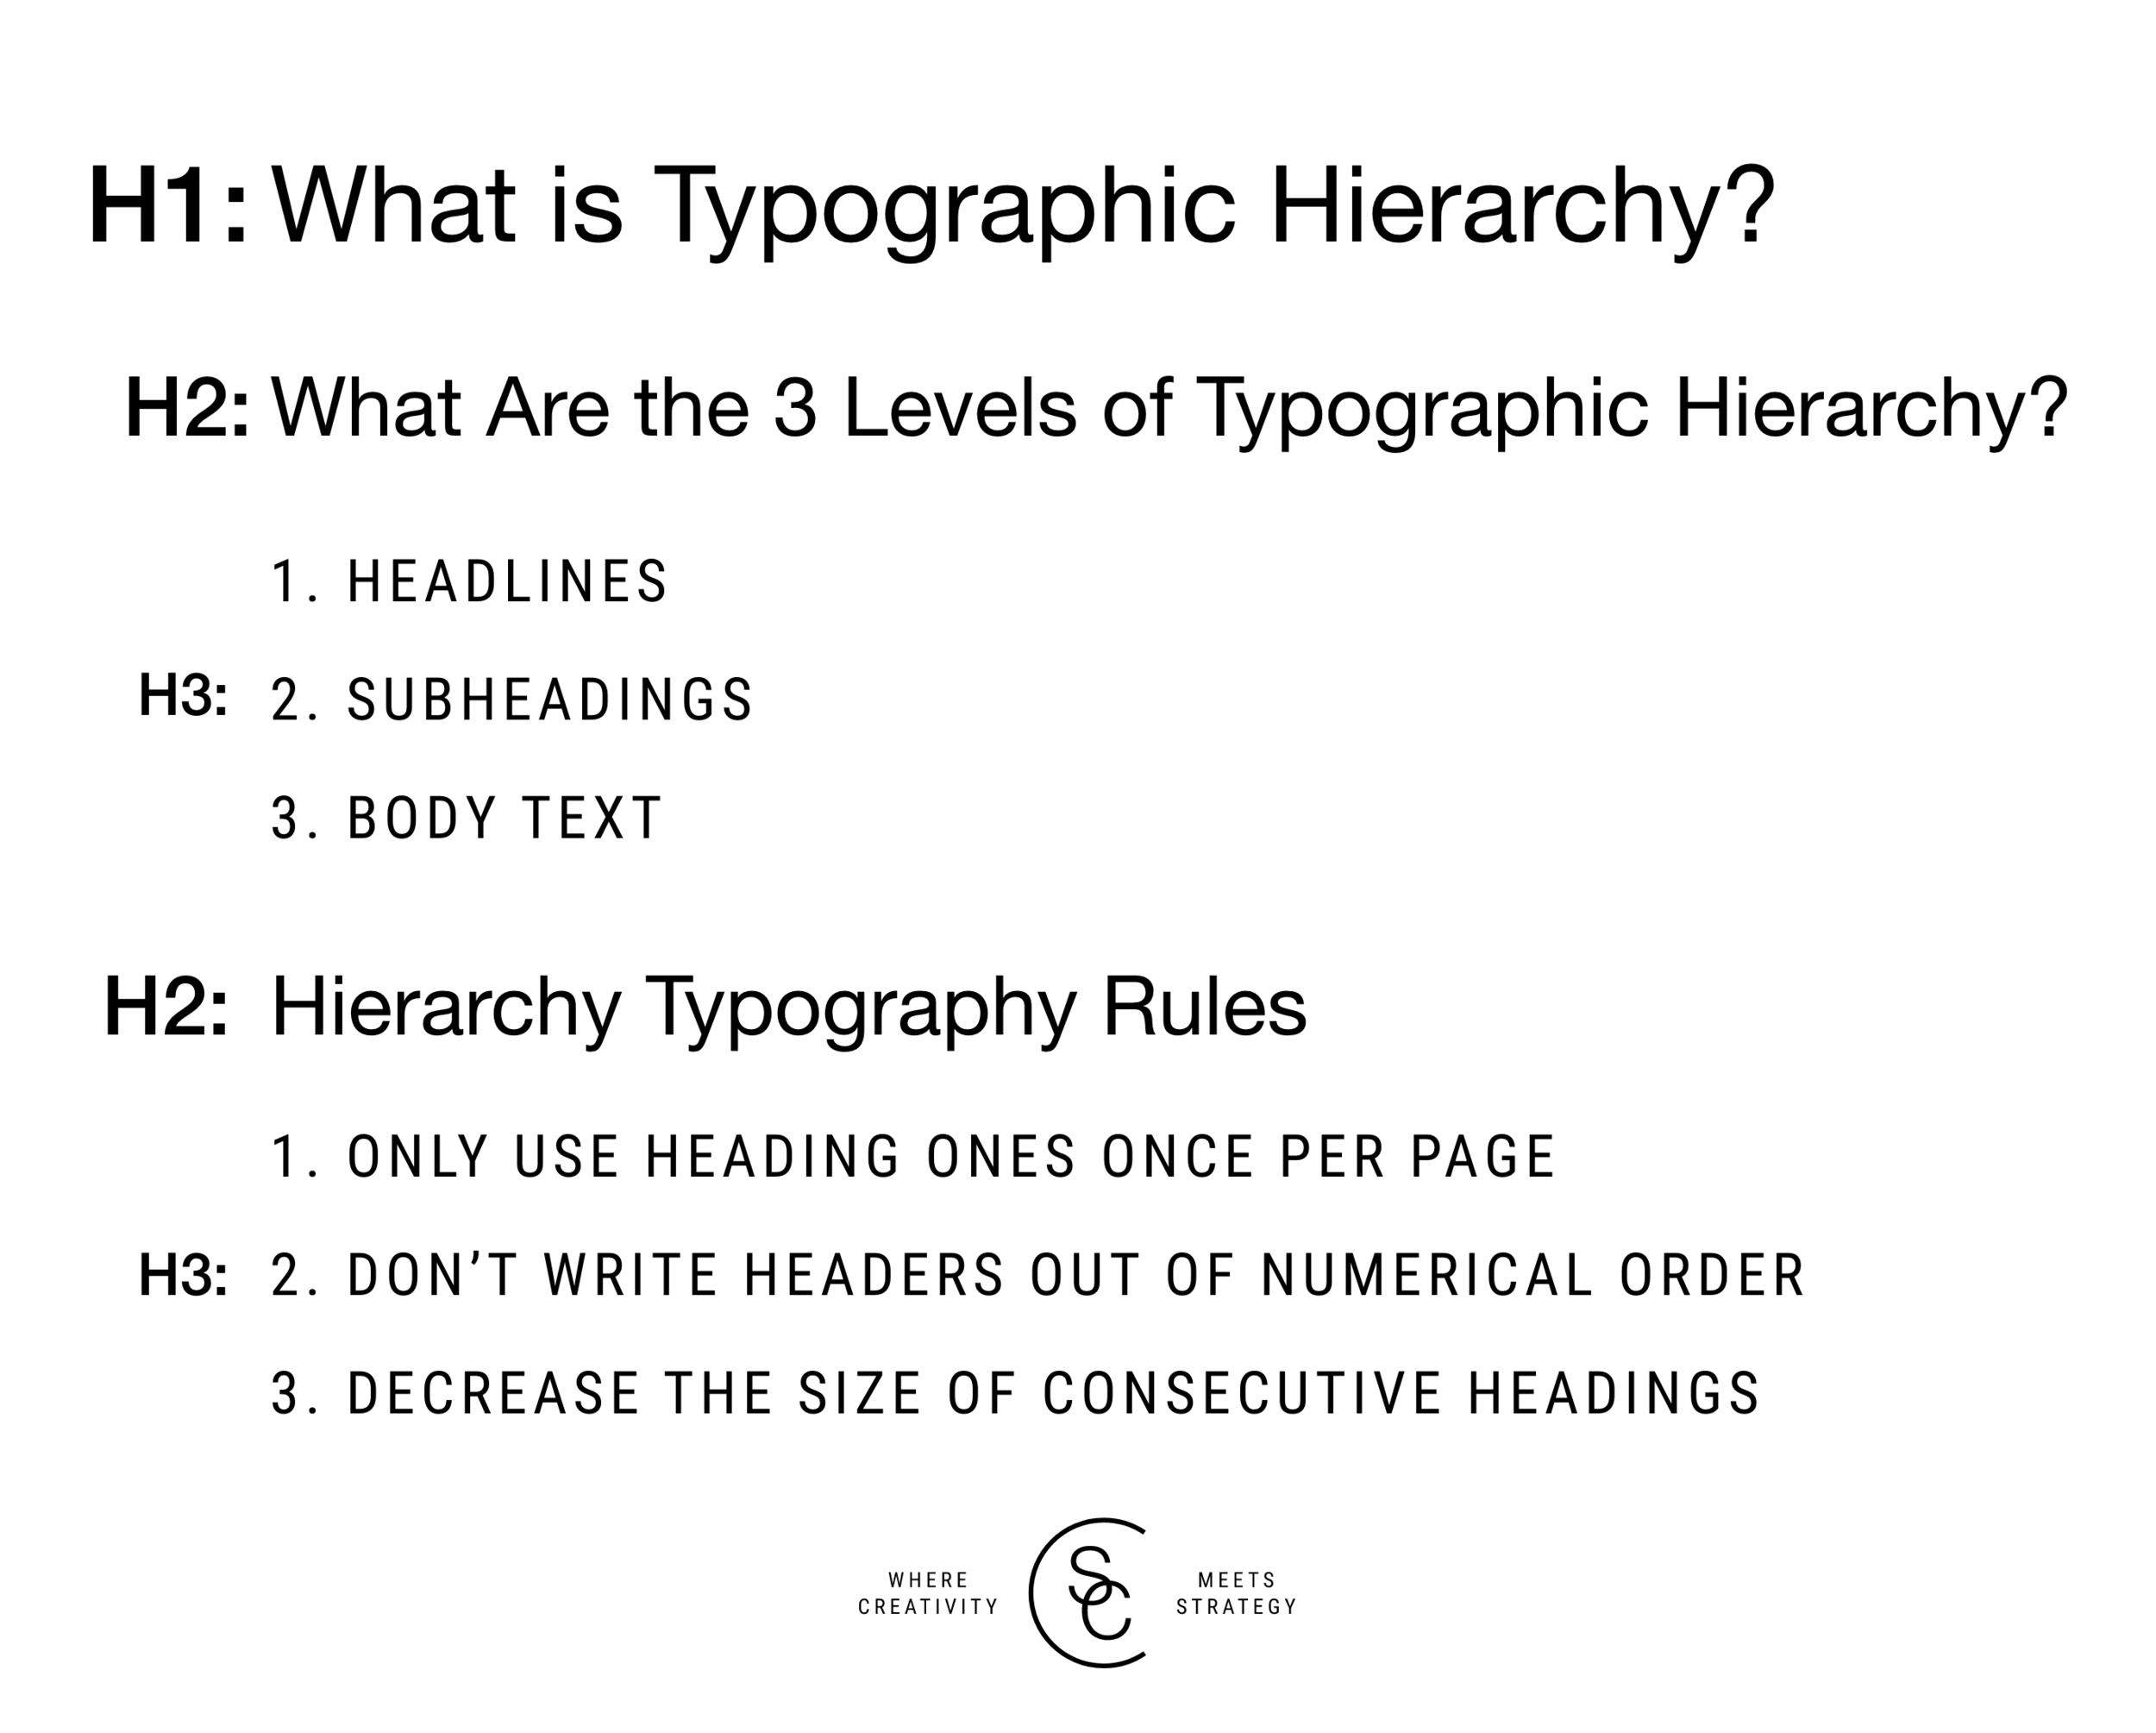
After you’re done with that first topic using an H2, you’d add another main topic using an H2, following the same header hierarchy. Most of the time, you won’t go past an H3 unless your content is very complicated.
Note: You never want to use an H1 more than once because it signals what your page is about to Google and you don’t want to send conflicting information.
To learn more, check out Your Guide to Brand Typography and Hierarchy.
14. Add Internal Links Throughout Your Site
Internal links are links between pages on your website.
An example of internal links is your main navigation. From the homepage, a visitor can link to various pages on your website. Links in your navigation mean that you want users to easily find them, which gives Google an idea of your website structure.
Blogs are another primary place to add internal links. Every blog should end with a call to action that links to your contact page at a minimum. Within your blog content, you can link to other relevant articles you’ve written as well (as you’ve seen me do in this blog).
Internal links help Google understand the key pages on your website. Pages with multiple links, both internal and external, are considered to be more important than others.
Having a link-building strategy is one of the pillars of SEO because links signal to Google that your site is a quality resource, especially when other websites link to your content (also known as backlinks).
15. Start Writing SEO-friendly blogs
If you want your website to rank on search engines, you need to start blogging—full stop. Small businesses that blog get 126% more lead growth than those that do not according to Hubspot. Here are 5 reasons why your business needs a blog:
Blogs provide value to your audience
Blogs turn browsers into buyers
Blogs promote your business online
Blogs position you as an authority
Blogs drive traffic to your website
The ultimate reason is that blogs help your website rank for relevant keywords. You only have so many core pages on your website, but blogs give you the opportunity to rank for additional pages that include highly specific, keyword-rich content.
For instance, my blog 4 Logo Variations Every Brand Needs brings in two-thirds of my website traffic alone:

I now rank for over 100 keywords related to logos just because of that blog! That’s the power of blogging in your business. If that doesn’t convince you, I’m not sure what will.
Read these 7 tips on how to write SEO-friendly blog posts to get started.
Contact a Squarespace SEO Specialist
At Selah Creative Co., every decision we make for ourselves and our clients is backed by strategy. If your website just looks pretty but doesn’t drive any traffic, it’s not being used to its full potential. Every website should generate an ROI for a business.
Think of your website like an employee. If you give it the right tools to work with, it will succeed. If you leave it alone, you better believe it’ll be slacking.
SEO is what gives your website an engine to move forward.
Are you looking to rank on the first page of Google?
Do you want to drive more traffic to your website each month?
What about increasing the number of leads your site generates?
If you need help setting up a blog on Squarespace, ideating relevant blog ideas, creating a keyword strategy, auditing your website’s SEO, etc. – reach out about our Squarespace SEO services. As a Squarespace SEO expert, I help businesses make their websites work for them.
